Copyright 2004 Gregory J Scott.

Ruby Throated hummingbirds in flight, all immature males, so far as I know. 
You'll find technical information in columns on the right, and also some high resolution detail photos.


Hummingbirds and red tubular flowers are a classic combination. They will feed at other kinds of flowers, but in this hemisphere, they form a symbiotic ecological system. Hummingbird migrations tend to be timed approximately at times which coincide with abundant blooms of suitable flowers. Some homo sapiens have entered into the relationship to supplement this natural system with bird feeders, and non-native species of appropriate flowers. Almost all species of flower may be of some interest to a hummingbird, but most are only of value because of the insects they harbor. If you were a tiny insect, then you would consider a hummingbird to be a terrifying carnivore, if you had the capacity to formulate such a thought!

This Autumn, I was late to begin photographing the birds, and have missed the migration of most of the mature males, who have the "namesake" iridescent ruby feathers at the throat, and and are the first to migrate in the fall. Hopefully, I'll have some next year!

I never see the migrating birds in the spring. I've got lots of hummingbird preferred flowers in the fall, but I heard "rumors" on the internet that the birds northward and southward migration paths are NOT the same. That could explain it. I would like more information on the specifics, if you can refer me to it. Although the "initial" migration of hummingbirds is well documented, it would also be of interest to know the "amplitude" of the migration from one year to the next, in a given location, and also gender of the birds reported, if known. Since immature birds are difficult to distinguish from females, this might be somewhat vague.
 Some technical information:

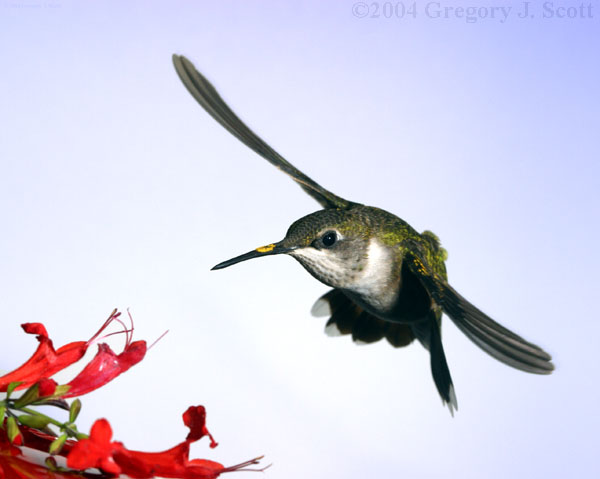
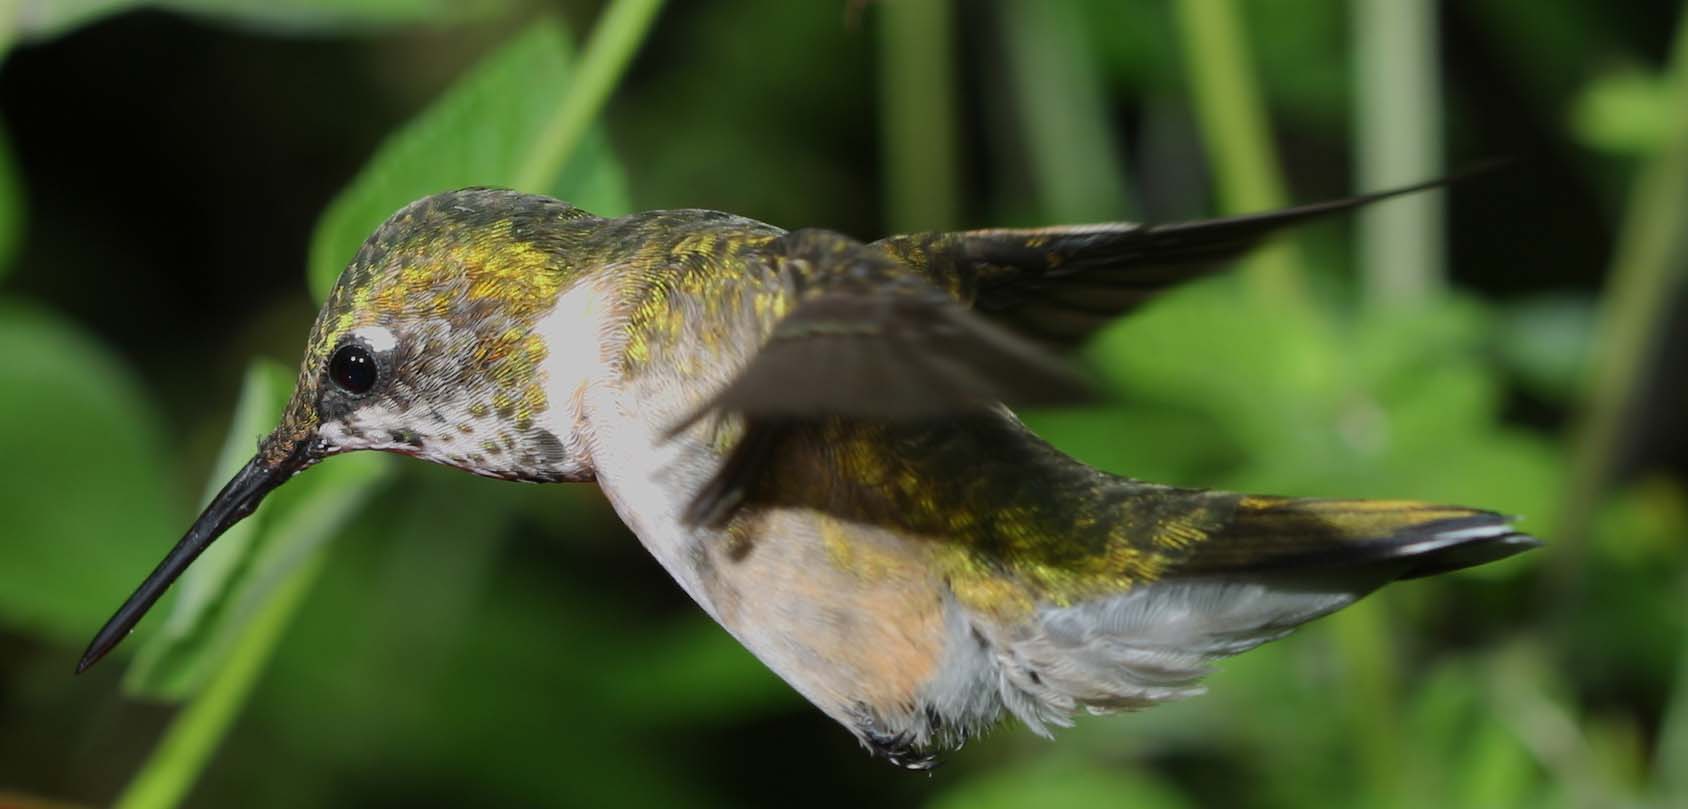
The bird was photographed with a fairly standard setup, which consists of a Canon D60 camera, Two Canon 550EX flashes, and sometimes a white card is used for a background. In this setup, the white card was close enough to the bird to for bright gray background. This is a bright gray background. It can be edited digitally, if desired, to substitute a "fake" background which appears more natural. Alternately, the feeder and flowers could be removed digitally, to produce an image showing only the bird itself.

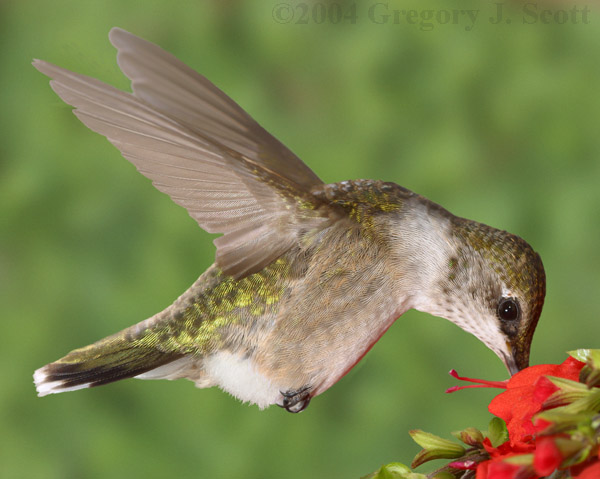
The flashes are set on manual exposure, at the lowest possible power, which is 1/128 with my Canon flashes. This makes the flash light very brief, about 1/20000th of a second, which can show some detail in the wings of a hummingbird.

The slave flash is quite close to the bird, about 7 inches, or so, and set on 105 mm setting, so that the light will be concentrated. in a small area. The master flash, in this case, was on my camera, not my preferred setup. and not as close to the bird.  This shot makes me happy that I decided to take some photos, rather than build my flash bracket. (I'd misplaced the one I had built previously.)

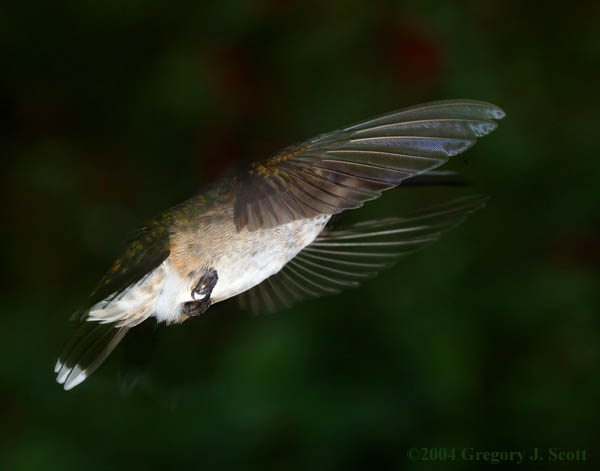
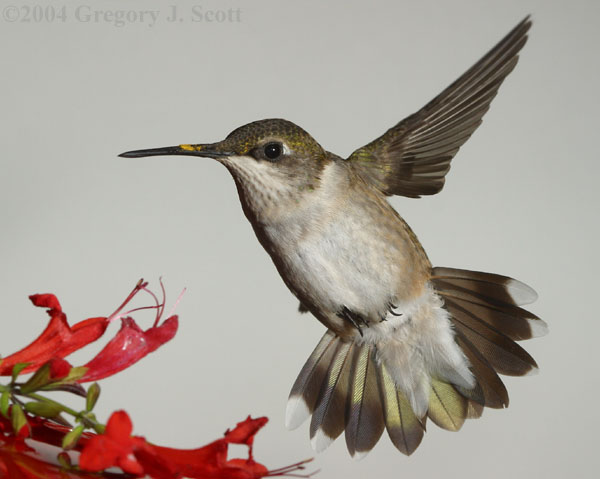
The camera is pre focused on the where the bird is expected to be. Very often, between "sips", he will hover several inches back from the feeder. This is particularly true if your feeder doesn't have a perch.  The perch rings are removed from most of my feeders, or a piece of red tape covers a feeding port I don't want the bird to use.

I mostly use a "saucer" style hummingbird feeder, which was concealed partially in this shot by placing one of the blooms which attracts the hummers, in this case a scarlet sage. This improves the "educational" value of the photo, and increases it's cosmetic appeal. However, it can detract from the "scientific" value of the image. If you know your flowers well, you'll note that the flowers on the left are "upcurving", but curve down when the flower is upright. The flower's stem is usually mostly vertical, so the horizontal stem would be atypical, anyway.

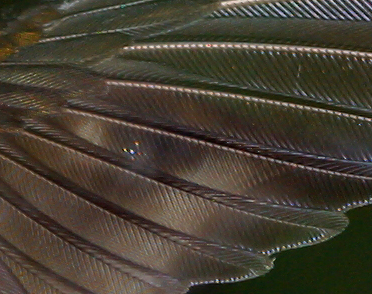
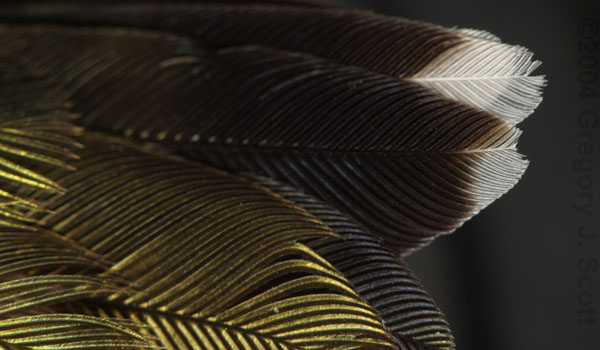
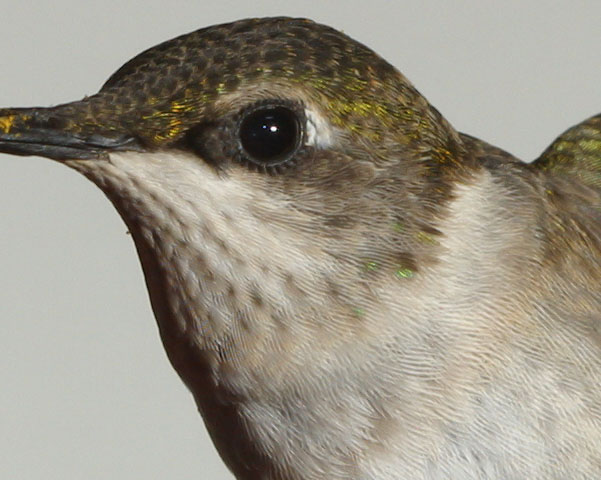
This detail photo shows the shot at the full resolution of the image. Note the detail visible in the eyelashes.

7470 Rth_im_dof_inset.jpg
.

gjs_7462_rth_im_male_pollen_beak_wings_low_600x480.JPG

This is my favorite hummingbird shot, so far this year, in terms of composition and grace.

I'm particularly fond of the shape of the bird in this pose. The "swoop" (dihedral") in the wing tips is quite pleasing to the eye. Not that a hummingbird depends on dihedral for flight stability! Being so small, and quick, a hummingbird's flight is not the same as other birds. At that size, the viscosity of air is much more significant a force than with other birds, and the hovering modes of flight are akin to "sculling" when paddling a canoe. A figure 8 motion, and  rotating the angle of attach to keep the leading edge in front on the trailing edge on both the forward stroke and back stroke. However, all of this is subject to instant variations to adjust the flight as needed, to maneuver agilely in a territorial battle, to hover upside down to feed from a difficult flower, or to perform abrupt maneuvers to escape the unidentified click of a camera.
This bird was shot with nearly the exact same setup as the bird above, as you might suspect from the fact that it's exactly the same bird, with exactly the same pollen clump stuck on his beak. I suspect that the yellow pollen is goldenrod, which is not a nectar source, but is a source of insects. There are a few other flowers in my garden which might have the yellow pollen, but mostly I have Cardinal Vine, and Scarlet sage, and I don't think that their pollen is yellow.

In this shot, you can see why I might use a light gray background. I've changed the gray to a blue, to simulate the sky. Perhaps the color is somewhat off, for a "classic" sky. And the whit area at the lower left would be quite unnatural in any natural sky. However, most people wouldn't notice these things, and my "simplistic" objective was to change the color composition to a "fundamental" triad, Red, Green and Blue.

I might have gone somewhat further with digital editing, and removed the detail of the feeder, below the flowers, but I haven't done so. It hardly seems worth the trouble, since they aren't very noticeable. It's somewhat draw your eye away from the bird to the flower, and even harder to look at the space under the flower.

Birds may quickly learn to disregard the flash and click of being photographed. The click seems more startling to them, which is why my Canon 100 mm macro lens is ideal for the purpose of taking "studio" flash shots of them. The flash can be as close as they need to be to produce correct exposure, and the camera can be a bit further back, to reduce noise, and to give a better chance of getting the whole bird in the frame.


Hummingbird with digital background

The grey background in this image from a "slightly underexposed" white card has been digitally replaced with this blurred background. It's an example of how a more natural "looking" background can be substituted (with some effort) on a digital image with a plain background. The  outline of the trailing edge of the far wing is not quite "tight" enough, so that it has a "grey halo" where the edge of the feathers hasn't been accurately located. This is a somewhat difficult process. This photo has also been altered to hide the feeder in the lower right corner with digitally substituted blooms.

I like the "lacy veil" transparency demonstrated  by the ability to see eye detail  and the head and beak through the wing. There's a photo below which provides a "magnified view" of the detail around the head of the bird, to show better why the wing is transparent.
Image was taken in daylight. However, the background is not sufficiently illuminated by the flash, being too far away, and therefore is nearly black. (Remember the Inverse Square law from natural science, optics, geometry, and physics. How many times does it take, anyway? Perhaps just a few more!) because of the strong dark green in this background, and the strong green light "bleeding" through the wings, this background could be fairly seamlessly switched with another image chosen to provide a dark green image.

The main flash in this photo was below the bird. There was a "secondary" flash located on the top of the camera. That's not optimal, and the darkness of the top of this bird illustrates that fact.

Just to the right of the image above there's a full resolution detail of the image above. You can see that the image of the bird's head, eyes, and the base of the beak is seen through lacy "holes' in the structure of the feather of the bird. On the other hand, the brighter "white" lines on the feather shafts and feather tips are places where geometry and gaps in the feathers provide a reflection of the flash's light. They're useful for observing the following fact: the edge of a bird's flight feather isn't particularly "feathery" at all, as most people mean the word. The barbs and mini barbs (barbules?) lock together, and the wing tip is mostly a smooth curve, at the macroscopic level.
The micro-structure of the feather is opaque or translucent, for the most part, at least in macroscopic detail, depending on just how you define translucent.

The high resolution image below is at full resolution, except for JPEG compression, as it was taken.  What I like about it is the fact that the bird is "broadside", and that the head of the bird is in very sharp focus, an the rest of the bird in fairly good focus.  The background is an example of a "natural" background, which is illuminated by the "natural" (ambient) light, but somewhat underexposed, about 2 stops, so that it won't be bright enough to make the wings look transparent because of "ghost images".
4938 Immature Male Ruby Throated Hummer, wide format
Ghost images are a consequence of the fact that flash photos, in general are actually, in a sense, a concurrent double exposure. The flash exposure is very short, and occurs during the much longer exposure which begins and ends when the shutter opens and closes. Usually, the flash exposure is at a very brief portion of time right at the beginning of longer period of time that the shutter is open. That's because in many cameras, there's a "trick" used to obtain a faster shutter speed. As you set the shutter from very slow to faster settings, the shutter stays open for shorter and periods of time for shorter setting, up to a limit. Then, on my camera at 1/200th of a second, the limit of shutter speed is reached. This is usually called the shutter's "sync" speed. That's because it's the fastest speed that you can use with your flash, and get a completely exposed image. At higher speeds, the shutter begins closing before it's completely open. In effect, to achieve "higher" shutter speeds, the shutter doesn't open and close any faster than 1/200th of a second at all. It's just that a SECOND shutter opens first, and then closes just behind the "first" shutter, to produce a slit, instead of a completely open shutter. Actually, that's the way it works all the time, but at 1/200th of a second or slower, there's always a time when the shutter is completely open. However, at faster shutter speeds, the shutter is a thinner and thinner slit. If the flash goes when the shutter is too fast, the flash will only illuminate a rectangular "slit" which will not fill the entire frame. At high shutter speeds, the slit is quite narrow.

Anyway, to get back to the "double exposure", the flash exposure is a very short exposure made by the light produced when the flash fires. The other light that comes through the lens the whole time the camera shutter is open, (a much longer time, remember) is the "ambient" exposure,. The non flash light is the usually "natural" light which illuminates the subject when the flash is not firing. Usually it's the regular sunlight, or the filtered shade light, if you're outdoors., for example. If this ambient light is at the "correct" exposure, flash set to a slightly lower brightness can be used as "fill flash" to provide some extra light to illuminate the shadows, particularly of nearby subjects. (You didn't forget the inverse square law, already, did you?)  Usually fill flash is 1/2 stop or 2/3 stops less light than the ambient light., so that the shadows will be brightened somewhat, but that the flash won't be the main light in the photo, or even "overpower" the ambient light anywhere except in the shadows.

In high speed flash photography, the situation above is intentionally reversed. If the ambient exposure is stronger than the flash exposure, a rapidly moving subject, like the tip of a wing, will merely be seen as a very faint image on a normal looking background. I.E., the image will be a "ghost" image, of nearly the kind that is usually meant when somebody calls an exposure a "double exposure", except that in normal parlance, a double exposure is two exposures in the same images that are NOT made during in overlapping intervals of time. The "ghost" image is the flash exposure, and the background that is seen through the "ghost" is the "shutter" exposure, made by ambient light. To keep this from happening, the flash is set brighter, so that it will produce the "correct" exposure for the image, without regard to the ambient light, and the background is intentionally set 1 1/2 stops to 2 stops underexposed. This can be done, the shutter speed and f-stop can be adjusted to vary the light from the ambient light. Adjusting the shutter speed will NOT affect the flash exposure, as long as the shutter speed doesn't exceed the sync speed. The f-stop (aperture) will affect the flash exposure. The flash exposure can be adjusted with the f-stop and the flash power setting, and the  distance from the flash to the subject. (Be sure to be remembering the inverse square law!)  This does not have to be done mathematically. With a digital camera, the easiest way to accomplish this is to adjust set the f-stop to a value which is somewhere in the "middle" to "low middle" numbers. For example, on a camera with f2.8 to f32 f-stop range, that might be from f4.0 to f16. You'll want to be more toward f16 if you need to get the whole bird in sharp focus, and more toward f4.0 if you want the sharp portion to be as sharp as possible, if you're short of light to make a good exposure. (These values regard the flash exposure, but since the f-stop affects both the ambient exposure and the flash exposure, they need to be considered simultaneously here.

So here is a "procedural" method for setting up the camera, an flash,  the exposure on your camera and flash:

First choose the background. If you want the background to be illuminated by flash to eliminate ghosts, it must be quite near the bird, which can cause problems. There will tend to be deep shadows between the leaves of the plants in the background. The extreme range in dark and bright created can detract from the bird's assumed central role in the image. Such backgrounds are difficult to "compose' or find. Even if you artificially "pack" the background with a dense cluster of potted plants, the result can tend be distracting and the lighting variations extreme. One way to avoid this is to use a natural rock,  tree, or other surface as a flatter background, to reduce the depth of shadows. Plants in front of this "wall" won't have such deep shadows, since the rock, tree, or other surface will be somewhat illuminated as well. The more "synchronized" flashes you can use in unison with your master flash the better. The limit on the Canon flash system is one master flash, and two slaves. A studio photographer would prefer at least 5 or 6, to give suitable lighting for background and subject, 3 for the subject, 2 for the background, and perhaps another for the foreground, for example. If you keep the near background clear, it's relatively easy to have a black or nearly black ground, which is simple, but perhaps the most unnatural of all, since hummingbirds don't fly at night.

Next, set up your hummingbird bird feeder, or choose the flower you expect the hummingbird to visit. Place the feeder in a location with the right lighting conditions, generally shade is right and necessary to produce good high speed flash photos with ordinary store-bought flashes. Shade is usually necessary not only for the hummingbird subject, but for the background directly behind the bird, to avoid the ghost images. You could have bright sunlight in other parts of the background, but the difference in lighting will be noticeable and very possibly objectionable. Like a fine gem, hummingbirds usually look best with simple settings. If you want a "natural" background illuminated by ambient light, choose a background quite a distance from the bird, so that it will be blurry. You may prefer to have a few flowers of the kind that the hummer is feeding on in the very near foreground or near background, so that they will be at approximately the right flash exposure. You must place the feeder in line with where the camera will be, and where the background is.  Using a white poster board on a tripod for the background can simplify all of these placement issues, and give simplified compositions with no ghosts which can be digitally manipulated to produce clean background. In that case, you can place the tripod with the "background" card in position last, if you prefer, but it's probably better to do it first so that the height issues work out correctly, unless you have a stepladder handy to serve as a tripod/easel for the background  card.

Next, set up your flashes, at the correct distance to produce a good exposure. If you flash is attached to the camera, that should make the next step easier. If you have a good telephoto capability, it may be better NOT to have the camera attached to the flash, since moving the camera back farther than the flash can have advantages. The flashes, if you have more than one, and perhaps reflectors, should be placed to illuminate the bird somewhat evenly, provide a "glint" or catch light in they eye. Ideally at least three lights should be used: one low and in front of the bird and toward the camera, to illuminate the belly and throat and under wings. One should be high and behind the bird, and near the camera, to illuminate the back of the bird. Ideally, a third light might illuminate it from above, in front of the bird, and beyond the bird, with respect to the camera, so that the far wing is illuminated from the top, and the top of the bird is better lit than the bottom, which is typical of natural light. Another factor to consider is what illuminations and angles will produce maximum iridescence. In general, the strongest light on the bird's iridescent feathers should be about 15 degrees from the camera, and to the left, if the bird is facing left, or to the right, if the bird is facing right.  I only have two flashes, and get good results, and you can't follow my instructions "perfectly" with one, two, or event three flash heads. So experimentation is very important here.

Next, set up your camera. focus where you expect the bird to be, and take at least three test exposures, one with a small branchy twig or feathery leaf where you expect the hummingbird to be. Check the focus, and depth of field very carefully on this shot, and the background exposure. Take another test exposure with your hand, or perhaps a standard gray card where the bird will be, and make sure that the flash exposure is correct. If it's correct for you hand, it should be correct for the bird, approximately. Holding your fingers apart can help to check depth of  field. Position the center finger to simulate the bird's head, and the finger to the left and right to simulate the left and right wing tip. Use your finger prints to judge the clarity of the focus and depth of  field. If possible, download the image to your PC to check the focus and the exposure. (Tricks there!)

Finally, when you shoot birds that visit your "studio" constantly evaluate the shots you get for focus, sharpness, accuracy, exposure (light conditions change continually). In particular, the bird may not be at the distance or angle you expected him to be. You may need to refocus or even change camera position and/or lighting to adjust. If your camera or digital image software provide an exposure histogram, be sure to check that also. Check your background exposure, in particular, since even though your flash exposure will be more or less constant, the ambient light will change continually.

For high speed flash photography, you will need the bird and the background in shade, so the best shooting times are in the morning and evening. This is when the birds feed most heavily, so that's somewhat convenient. In atlanta georgia, shooting in the evening has been best from 6:00 to 7:30, and from about 7:30am to 9:30am in the morning. This will vary in your location depending on if you are in a deep gully on top of a hill, and on overcast days versus sunny days.

If you support everything on tripods, and have my configuration of two flashes a camera, a feeder, and a card in the background, you can get away using as few as 2 or 3 tripods: One for the camera, one for the flashes (mounted together on a bracket bar, which is mounted to the tripod. I use two mini ball heads on the wooden cross bracket, which permits me to adjust the flashes at whatever angle works best. for the lighting I want to use. You'll probably want to use a tripod to support the background card, so that you can easily move it forward and back to produce the desired exposure for the background.
I support the feeder by hanging it from a low branch, or putting it on top of a table, chair, bench, bucket, or a wooden broom handle sharpened at one end to make a feeder support pole. This is hammered into the ground in front of a good background. After I get set up, I generally leave my background alone, and move my flash as needed, and perhaps my camera, to adjust for changing light conditions. Setting everything up can take an hour or more the first few times you do it. If you've been doing it several days in a row, and know  exactly where you want everything to go, you might be able to do it in 15 minutes or 1/2 an hour.

I use a few valuable camera accessories: I 've got a short remote camera trigger cable/switch, and a long extension cable for it. I can take photos from 30 feet away or more. When it's hot, I will snake the cables out a window, and shut the windows gently on the cables, and watch the birds and trigger the camera for the comfort of an air conditioned chair with a view of the feeder. I've added a laptop and a powered USB hub, and a long cable from the laptop to the hub. This allows me to download the photos from the cameral to the PC as soon as I take them, using the camera's USB adapter cable. I can also trigger the camera from the computer, which would allow you to eliminate the trigger cable, particularly if it's not available on your camera. However, in its version, my software tends to hang frequently on my operating system/software combination, and so I tend to trigger the camera with the remote control and download only the photo I expect to be "best" from any series of photos of a bird at the feeder. (I find that when downloading a photo, I can't take another photo. So I've learned not to download more than one photo at a time. Hummingbirds don't linger very long at the feeder. They're usually gone in somewhere between 5  to 30 seconds, though sometimes, particularly with a perch, they may linger far longer.

I sometimes focus on a real flower, and wait for a bird, but birds visit my feeders much more frequently than any one of my abundant flowers. Therefore, it's been hard for me to get good shots of birds at feeders, and I don't really have one acceptable one yet!

Now, once you've set the camera so that the ambient exposure is properly underexposed, you set the flash exposure. The best way to do this, for the purpose of this discussion,  is to put the flash on manual, set the flash on the lowest possible power, to produce the shortest possible flash, and put the flash very close to the subject. With a digital camera, to adjust the flash exposure, just move the flash closer and farther away from the subject, to make it brighter or darker. If you find that the image is too bright, you can consider changing the "magnification" on your flash, if you have that adjustment. A wider beam will provide a dimmer light. Or you can consider adding a diffusion filter over the flash to soften the light, and make the photos seem less harsh. Put a seed head of some grass, or a small twig with smaller branches into the hummingbird feeder port, and use that to focus on the "substitute" bird, and also to take a test shot to check the ambient and the flash exposure. You'll want to to focus the lens so that the focal plane will be slightly toward the camera from where you expect the bird to be. Since you can't see into the "center" of the bird, you'll want to focus on the side of his head (the eye!) or if possible, the whole side of his body. If you have extreme depth of field, you might be able to get the whole bird in focus, from head to tail, and wing tip to wing tip. This takes extremely bright flash, and a quite large f-stop number. to get this kind of depth.

Or, as in the case of the photo at the top of the page, the bird might cooperate, and place the whole body, wings, belly, head, beak and tail in the focal plane, or close enough to it. Such a shot is extremely rare, because we're not quick enough to move the camera to photograph the bird, You should pre focus where you expect the bird to be, and wait for the bird to come into view, and take the photo, or photos, when the time seems right. Luckily, a hovering bird moves relatively slowly, in contrast to conventional flight and hovering at and just behind a flower or feeder is typical feeding behavior for a hummer.


This is a shot at very high magnification of the feathers at the bottom of the bird's back and tip of the tail, as seen from directly behind the bird. You'll note that the feathers aren't particularly "feathery" at all, as I believe that people mean it, except as you see them at the left side of the image, which is toward the top of the bird. Most of the feather tips on the back of the bird aren't as tightly locked together along the perimeter. However, the bird's flight feathers have generally smooth edges, which are locked together by the barbs,  (The flight feathers include the tail, which serves rudder and keel, or  horizontal and vertical stabilizer to the bird.